LinkIndexPrint
Contents
 Welcome
    Ask MaxiPlan
 Using Cascade Planning
    Data Entry Shortcuts
 Working with Planning Projects
    Designing A Cascade Project
    Project Management
       Creating and Maintaining Projects
       Period Sets
       Currencies
       Creating A Splash Screen
       Allowing Other Users Access
       Backup and Restore
       Virtual Period Definition
       Deployment Alias
       Publish Documents
       Project Status
    Building an Application
       Building Application Models
          Building A Cube Model
             Basic Setup
             Selecting a Period Set
             Measure Settings
                Defining the Measures List
                Setting Measure Attributes
                Measure Formatting
                Defining Calculations for Measures
                Other Functions for Measures Editor
                Cross Referencing Measures
                   Dimension Order in Planning Models
                   Cross Referencing Within The Same Model
                   Cross Referencing to Another Model Cube
                   Cross Referencing to the Parent of the node
                Measure Logic Functions
                   PREVIOUS function
                   SUM function
                   MAX function
                   MIN function
                   DEPRECIATION function
                   INT function
                   ROUND function
                   ROUNDUP function
                   ROUNDDOWN function
                   IF Function
                   SWITCH Function
             Dimension Settings
                Defining Dimension Lists
                Defining Dimension Properties
             Miscellaneous
             Finishing The Model
             Advanced Features
                Specifying Consolidation Logic
          Building A Transaction Model
             Basic Set Up
             Defining Dimension Lists 
             Defining Transaction Model Fields
             Additional Definition for a List Field
             Additional Definition for an Expression field
             Additional Definition for a Lookup Field
             Optional Validation for Text, Date, Integer & Value Field
             Defining Field Format & Access
             Miscellaneous
       Model Flow and Linking Models
          Using Links (the 'Push' Method)
          Cross Referencing (the 'Pull' Method)
       Deployment and Workflow
          Deploying Models for Input and Review
          Allowing Users to Extend Models
          Setting up and Managing Workflow
          Workflow for Users
       Advanced Project Functions
          Measure Filters
          Jobsets
             Defining A Jobset
             Run Jobsets
          Data Integration
             Create Dynamic Model
             Import to Cube
             Import to Transaction
             Export Cube Data
          Maintenance
             Model Maintenance
             Link Maintenance
             List Maintenance
             Calculate all cubes
             Versions
          Pre/Post Rules
 Reports and Scripting
    Define Scripts
    Define Reports
    Publish Documents
    Manage Scripts


Home > Working with Planning Projects > Building an Application > Building Application Models > Building A Transaction Model > Defining Dimension Lists

Defining Dimension Lists
Last Updated 2/28/2012 1:17 AM


Next we select the Dimensions tab to define any dimensions we wish to use in our Transaction Model.

A Transaction Model can utilise a dimension list in much the same way that a Cube Model does, the only major difference being that Transaction Models do not consolidate, and a dimension member is simply a special type of field in the Transaction Model that appears as a drop down list.

Any consolidation required will be done when we link the Transaction Model to a Cube Model.

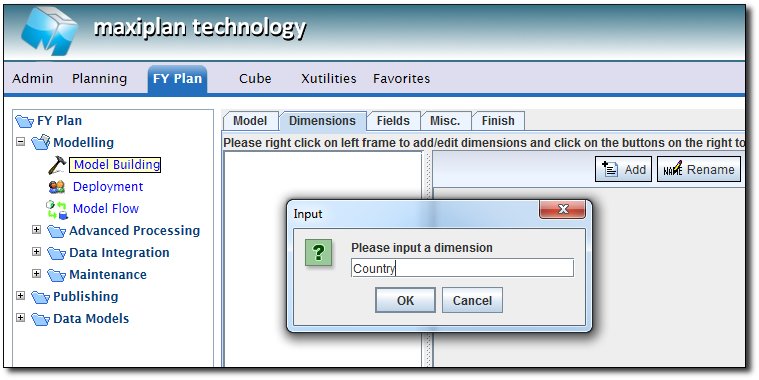
In the Travel Costs model shown, we want to separate each submission by country, so we use the Country dimension similar to that defined for creating the Cube Model.

If we right click the mouse on the left panel containing the dimensions for the model, a pop-up menu will be displayed and we can select the Add option.

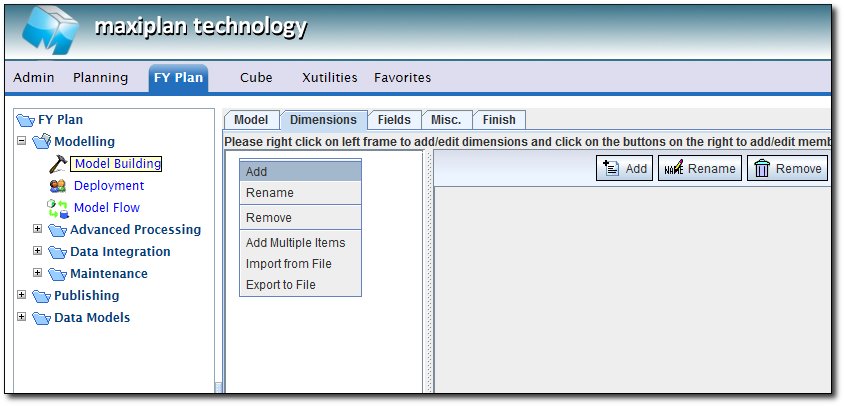
TIP: If you need to create more than one dimension at a time, select the 'Add Multiple Items' option which will enable you to add several dimensions at the same time.

When we click on the Add option, a pop-up will appear enabling us to enter the dimension name. In our case, we will enter the dimension name Country.

Next we need to specify the members of our Country dimension.

To do this, we select the dimension and click on the  button at the top right of the member lift frame.

A pop-up will appear into which we can enter the dimension member names. For our example, we will add the following members: (codebox)

  • London
  • Paris
  • Singapore
  • Thailand
Note that we do not need to include Asia, Europe and World in our list because no consolidation is involved in a Transaction Model.

TIP: If you need to keep a dimension list synchronised between several models, you can include the consolidated nodes in the dimension list for a Transaction Model and the consolidated members will simply be ignored.
For example, we could have exported the dimension list from our 'Expenses' Cube Model, and instead of typing the members in above, we simply import the dimension for our Transaction Model from the exported comma delimited file from 'Expenses'.


See also


See also