LinkIndexPrint
Contents
 Welcome
    Ask MaxiPlan
 Using Cascade Planning
    Data Entry Shortcuts
 Working with Planning Projects
    Designing A Cascade Project
    Project Management
       Creating and Maintaining Projects
       Period Sets
       Currencies
       Creating A Splash Screen
       Allowing Other Users Access
       Backup and Restore
       Virtual Period Definition
       Deployment Alias
       Publish Documents
       Project Status
    Building an Application
       Building Application Models
          Building A Cube Model
             Basic Setup
             Selecting a Period Set
             Measure Settings
                Defining the Measures List
                Setting Measure Attributes
                Measure Formatting
                Defining Calculations for Measures
                Other Functions for Measures Editor
                Cross Referencing Measures
                   Dimension Order in Planning Models
                   Cross Referencing Within The Same Model
                   Cross Referencing to Another Model Cube
                   Cross Referencing to the Parent of the node
                Measure Logic Functions
                   PREVIOUS function
                   SUM function
                   MAX function
                   MIN function
                   DEPRECIATION function
                   INT function
                   ROUND function
                   ROUNDUP function
                   ROUNDDOWN function
                   IF Function
                   SWITCH Function
             Dimension Settings
                Defining Dimension Lists
                Defining Dimension Properties
             Miscellaneous
             Finishing The Model
             Advanced Features
                Specifying Consolidation Logic
          Building A Transaction Model
             Basic Set Up
             Defining Dimension Lists 
             Defining Transaction Model Fields
             Additional Definition for a List Field
             Additional Definition for an Expression field
             Additional Definition for a Lookup Field
             Optional Validation for Text, Date, Integer & Value Field
             Defining Field Format & Access
             Miscellaneous
       Model Flow and Linking Models
          Using Links (the 'Push' Method)
          Cross Referencing (the 'Pull' Method)
       Deployment and Workflow
          Deploying Models for Input and Review
          Allowing Users to Extend Models
          Setting up and Managing Workflow
          Workflow for Users
       Advanced Project Functions
          Measure Filters
          Jobsets
             Defining A Jobset
             Run Jobsets
          Data Integration
             Create Dynamic Model
             Import to Cube
             Import to Transaction
             Export Cube Data
          Maintenance
             Model Maintenance
             Link Maintenance
             List Maintenance
             Calculate all cubes
             Versions
          Pre/Post Rules
 Reports and Scripting
    Define Scripts
    Define Reports
    Publish Documents
    Manage Scripts


Home > Working with Planning Projects > Building an Application > Advanced Project Functions > Data Integration > Import to Transaction

Import to Transaction
Last Updated 2/27/2012 9:29 PM


Apart from Cube model, we can also import external data to a Transaction model from a CSV file.

To navigate to the Import to Transaction wizard, {Project Tab}>Modeling>Data Integration>Import to Transaction


To define a new import for transaction model, perform the following steps:

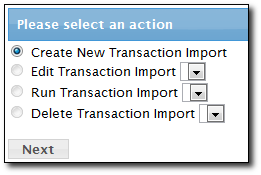
  • Step 1 Select the option to Create New Transaction Import and click the NEXT button.
  • Step 2 Select the source CSV File to be uploaded to Maxiplan by clicking on the Browser button. Click Submit to upload.

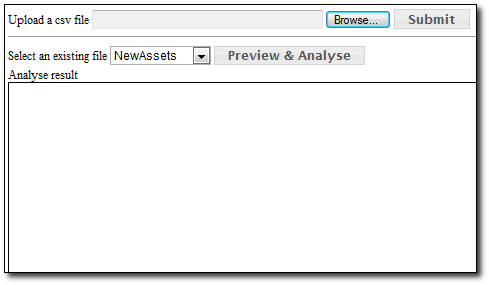
  • Step 3 Once uploaded, click on Preview & Analyse to view the contents of the file and analyse the fields.

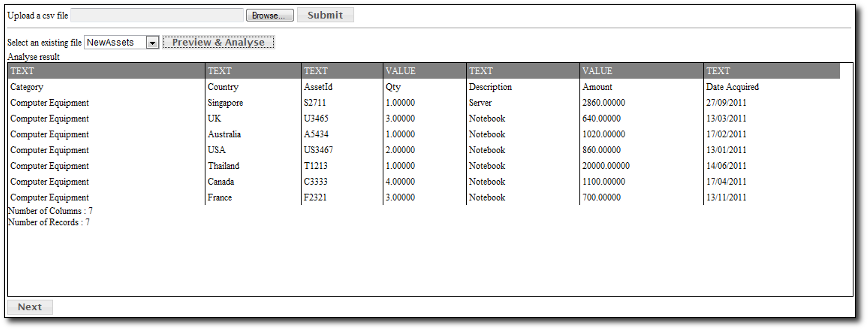
  • Step 4 It will display information on number of columns,data type for each column and the number of records. Click on NEXT button to continue.
  • Step 5 This screen requires you to input the name of the Import script. Note:Do not click on Save button yet!

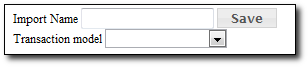
  • Step 6 Select the target transaction model.
  • Step 7 Select Append or Update mode. Append mode will add new records from the source CSV file to the model, while Update mode will update the model based on the identifiers specified in the import script .

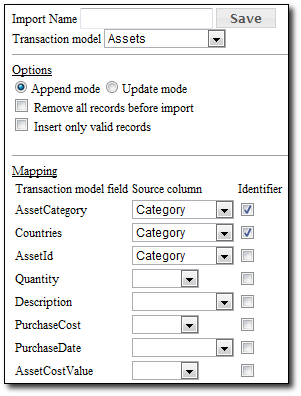
  • Step 8 You can select the option “Remove all records before import” to clear all the records in the model before inserting the data.
  • Step 9 Selecting “Insert only valid records” will only insert valid records during the import.
  • Step 10 The next part is to map the columns in the CSV file to the fields in the target transaction model.
  • Step 11 If you have an identifier columns/fields, you need to specify it by checking the box next to the dimension. Identifier means that for every same combination/identified column, it will only import 1 data.
  • Step 12 When you have specified the above,, you can click on the Save button on the top of the screen.
  • Step 13 To run the import, you need to reopen the Import to Transaction screen, and then select Run Transaction Import, and select the Import Script name you've just created.
  • Step 14 When the import completes, it will show the details of how many records were updated,inserted and invalid.
     

See also