Home > Working with Planning Projects > Building an Application > Building Application Models > Building A Cube Model > Dimension Settings > Defining Dimension Properties
Defining Dimension Properties
Last Updated 3/8/2012 9:57 PM
At this stage, our Country dimension is ready for use, but for our example we want each country to enter data in local currency so we need to define this dimension as the Currency dimension.
When we set a dimension as the Currency dimension within a model, it will be used to define the currencies for each element.
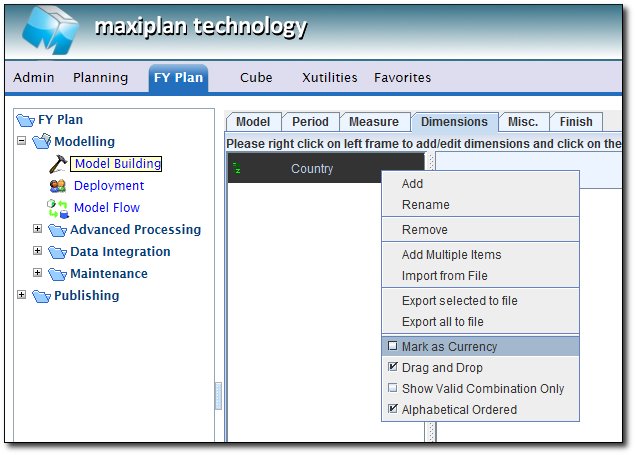
To set a dimension as the Currency dimension, we need to select the relevant option from the dimension options menu. To enable the menu, simply right click the mouse on the left frame showing the dimension list. A pop-up menu will appear proving a number of options.
ADD - This option allows a new dimension to be added.
RENAME - This option allows an existing dimension to be renamed.
REMOVE - This option allows for you to remove a dimension from the list of dimensions for this model. Use with caution.
ADD MULTIPLE ITEMS - This option is similar to the Add option except it allows the addition of more than one dimension at any time.
IMPORT FROM FILE - This option enables a dimension (and it's associated hierarchy and currency assignments) to be imported from an external comma separated file. Note that this file can be one that has been created using the Export to File option, or it can be created outside of Cascade by another application or manually.
EXPORT SELECTED - Exports the currently selected dimension and hierarchy and applicable currency assignment to a comma delimited file.
EXPORT ALL TO FILE - Exports all dimensions with their hierarchies and any applicable currency assignments to a comma delimited file.
MARK AS CURRENCY - Permits the currently selected dimension to be the dimension which triggers currency. NOTE: Only one dimension within a model can be marked as the currency dimension. If a dimension is marked as your currency dimension, it will immediately assign the first currency in your currency table as the default for all dimension members. You will need to assign the correct currency for each member.
DRAG AND DROP - This option switches off the ability to drag and drop dimension members onto one another to create a consolidation hierarchy. You only need to switch this capability off if you want to assign currencies to each dimension member.
SHOW VALID COMBINATION ONLY - This option will enabled the Droplist filter, which enable the user to see only valid combination of all the other dimension data for the selected member. Upon enabling this option, user will see the padlock icon next to the Dimension Droplist on the Input Grid.
ALPHABETICAL ORDERED - By default the Dimension droplist will be displayed in Alphabetical order. To change the order to follow the structure/hierarchy order, uncheck this option from the Dimension Option.
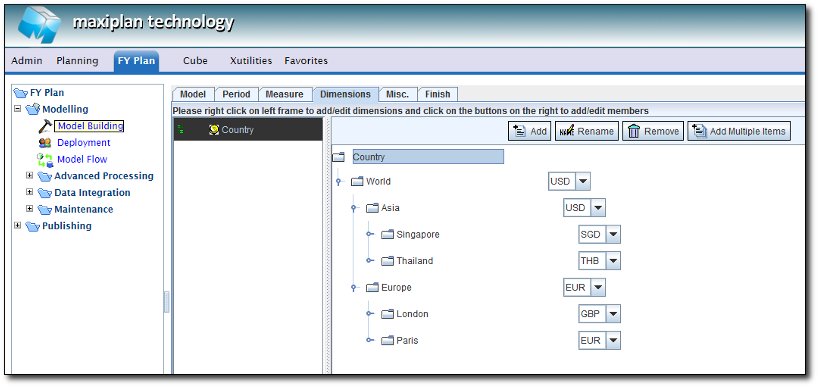
For our Expenses model, we will firstly mark the Country dimension as the Currency dimension and then switch off Drag and Drop so that we can specify the correct currencies for each member.
To change the currency for each member, simply select the currency drop down for each member (this appears once you have switched off the Drag and Drop facility), and choose the desired currency.
For our example, we will set Paris and Europe to Euros, Singapore to Singapore Dollars, Thailand to Thai Baht, World and Asia to US Dollars and London to UK Pounds.
See also
See also
| 

 Page URL: